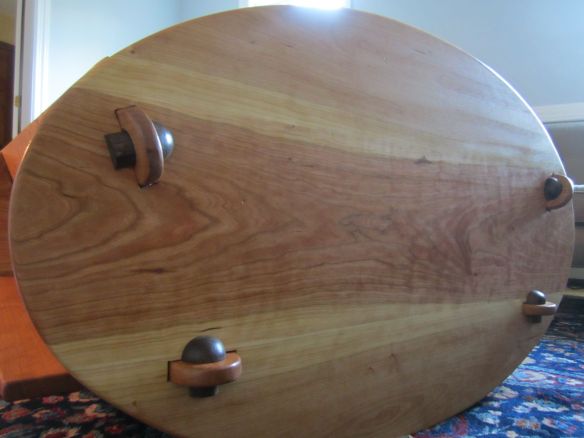
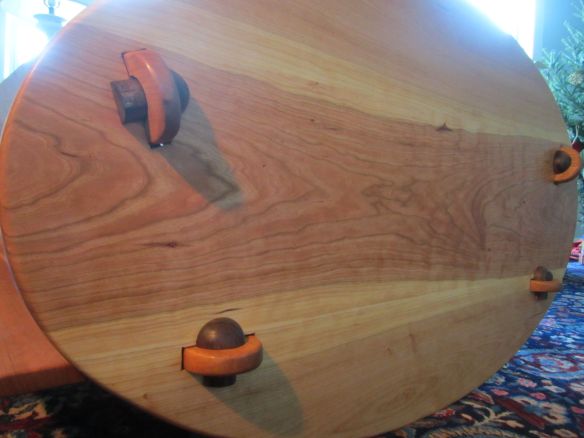
Cradle Pegs

When I was designing the cradle I went back and forth about what I would use for the though tenons.  I really like the look of through tenons and found quite a few options I responded to, but they were all linear spikes that didn’t feel right with the curves of the cradle.  I decided I needed to come up with a curved, or rounded tenon.  I also wanted to create one that would be easy to take in or out when the time came.

Sketchup was certainly my friend on this project:

Sketchup

My Sketchup helped me realize the head needed to be curved.  My sketchup skills however were not going to allow that!

Once I was happy with the design I needed to approach the one tool in my shop that I had yet to even come close to perfected–the lathe!

I started by glueing up two pieces of walnut.

I started by glueing up two pieces of walnut.

Cradle peg02

Next I headed to the nearly unused lathe to start to rough my stock

Next I headed to the nearly unused lathe to start to rough my stock

Based on the lines I roughed in--the pegs actually began to take shape.

Based on the lines I roughed in–the pegs actually began to take shape.

Cradle peg05

As I got closer, I cut the pieces down in order to create a smooth curved top for each.

As I got closer, I cut the pieces down in order to create a smooth curved top for each.

Dance of the Wooden Soldiers

Dance of the Wooden Soldiers

Next I headed to the band saw in order to cut the pegs  cleanly in half.  I don't use these wooden clamps often  enough, but sometimes they really come in handy!

Next I headed to the band saw in order to cut the pegs cleanly in half. I don’t use these wooden clamps often enough, but sometimes they really come in handy!

and then there were eight...

and then there were eight…

I had the cutest of shop assistants help me sand each of them down.

I had the cutest of shop assistants help me sand each of them down.

I laid each tenon out in order to trace out the mortise.

I laid each tenon out in order to trace out the mortise.

Cradle peg13

This made for a snug fit!

This made for a snug fit!

I must say this was really the 1st project that I had created using the lathe.  I am no turner (yet), but can see how the lathe and what I can create with it will begin to be in integral part of my designs and woodworking experience.

Thanks for stopping by the shop.

It’s Bed Time!

I recently finished up two loft beds for my son and daughter and I realized that before I blogged about that I needed to actually post the final results of the Twin Cradle.  I know, I know.  I’m a terrible blogger.  But then again, on the internet time kinda stands still.   I could blog about about anything and pretend it’s current.  Half the time I go back and catch up on ancient blog posts filling my reader.  Well enough procrastinating… Here in one post is the end of the Cradle Series.

 Twin Cradle; Part 4  The Wrap up

Well the twins are off to college by now…well not really, but they have certainly outgrown this cradle.

You might remember that one of my goals as to build this sans hardware.  I wanted it to be a piece of furniture that could be quickly assembled and then knocked down for easy storage.  It needed to be a beautiful piece of “temporary” furniture.  I’ll let you be the judge.

Cradle01

The finished product

Cradle02

My wife provided a luxurious pad for them to sleep on.

Cradle03

I was very happy with the grain selection in this beautiful piece of cherry.

Cradle04

A side view showing the curves and the divider

Cradle06

This little piece I designed to hold the divider in place.

Cradle05

…said divider in place.

Cradle07

The divider can easily be removed, allowing the twins to sleep together.

Cradle08

I designed & built foot rests on each side, so the cradle could be easily rocked with your feet.

Cradle12

The peg and though mortise

Cradle15

Introducing Alex and James!

Cradle20

Me and the best clients a guy could ask for!

Cradle09 Cradle10 Cradle11 Cradle13 Cradle14 Cradle16 Cradle17 Cradle18 Cradle19

So that wraps my cradle series.  I’ll post one more related post on how I built the pegs, so look for that.  Then I’ll catch up and share the loft beds.  I’ve also been building a chicken coop!

Thanks for stopping by the shop, it’s great to get back to blogging.

These are the people in my neighborhood…..

The Austerlitz Woodworker’s Show came as all things do, very quickly. My shop was quite full and quite active.  You remember I had an offer by an 8 and an 11 year old to ‘help’?  Well who could turn down help like that?  Their enthusiasm alone filled the shop.  I put my work aside and with the help of their mother, worked on turning pens and ice cream scoops!  What could be better?  I was able to put the finishing touches on the console table and build an ipad stand to display my work, I tried to squeeze in time to finish the shaker table but that just wasn’t going to happen.  I took a deep breath and said to myself “it’s all good, do what you can.  This is my hobby and I have to enjoy it.  No pressure!”  The rest of the day was fantastic, as my son and daughter taught us a thing or two about turning!

Austerlitz is very fortunate to have a thriving Historical Society which owns a 20 acre parcel of land that is the home of the Old Austerlitz Village. The village is a “living history museum of post-and-beam houses, a granary, a blacksmith shop, a one-room schoolhouse, a Christian Church and other historic buildings.”   The latest is a newly restored barn, which was raised just in time to host the show.

The ‘new’ barn.

Clark Olsen’s amazing screen and chair

I loaded in the morning of the show and but wasn’t able to fit into the barn.  So instead I shared the granary next to the barn with master craftsman Clark Olsen.


This town certainly houses some impressive talent!  The show consisted of 11 professional woodworkers and four hobbyists, all extraordinary in their own way.  The variety alone was was impressive, running the gamut from cabinetry, marquetry, classic shaker, windsor chairs, toys, furniture, even whirligigs.  Something for everyone!

Falling Water work by John Dunne

John Porritt taught me a thing or two about Windsor Chairs

I got an introductory lesson in marquetry from Herb Cook.

Clark Olsen’s Music Stand


The best part of any woodworking show is the camaraderie.   Woodworkers are the kindest, most giving folk you will ever find.  That has never more true than in Austerlitz.

What’s a show without whirligigs!!!

The Lighthearted Woodworker….

It was an terrific day. Very inspiring.  I met so many great and talented people, not only fellow woodworkers, but people from this amazing community.  I wish I had taken more photos and had time to chat with more people, but you can only squeeze so much into one day.

I wanted to mention all that attended and really extend my thanks for welcoming me and for your generosity.

The Woodworkers of Austerlitz: Jeffrey All, Reggie Brantner, Herb Cook, John Dunne, Randy Ezinga, Tim Hawley, Dick Light, Scott Mesick, Chris Landy, Clark Olsen, Brian Polhemus, John Porritt, Howard Reznikoff, Steve Somlo and Michael Walters.

Max and Samantha manning the booth.

I would be remiss if i did not point out that not only did Max and Samantha hold down the fort while Daddy was off being social.  They also sold all of their turned bottle stops!!

Twin Cradle Series, Part 3.2 : Failures and Fixes

-Through Tenons; Mortise failure/solution

It was not until I went to cut my mortises that I realized I should have laid these out and cut them before I cut my board into an oval, with no straight edges to register a cut. To make matters worse, the mortises were angled at 12 degrees to receive the headboard and footboard.

Attempt at chiseling out the mortis

Attempt at chiseling out the mortise

It was my intention to use a chisel out the mortises. I started on one and failed. In hindsight, I am not sure what I was thinking. It took me forever and I ended up with blow out on the bottom despite my best efforts. Ugh.

The result of my chiseling = Blow out on bottom side

The result of my chiseling = Blow out on bottom side

Plan B: Drill holes for my saw


I then went to plan B. I drilled out holes and rough cut the mortises with my skill saw. This seem to do the trick, at least at this point of the process. I then went in with my rasps and snuck up to my layout pencil line. At least I thought I did, there were places that I ended up over compensating as I was trying to dry fit the pieces.

Perhaps overkill: I used my jig saw to cut the mortises.


As my hand tool skills have refined since, I believe I would now go in with a small saw, perhaps a keyhole saw.  But my Jig saw certainly kept me moving.


**If you’re reading this and nodding your head (up or down), I’d love to hear your feedback on how you would approach some of the tasks I struggled with.  As with all things woodworking there are infinite ways to skin a cat, and we can all learn by sharing our experiences.

Knot The Right Epoxy Fill

I love me knot….

I am a huge fan of knotty pine, and I am always looking to see how I can incorporate the knots into my layout. I have not, however dealt with the knots properly, until now, well almost.

How beautiful is this–Knot!


(I have more knot knot jokes, but I will save them for another post.)


Ugh. Nice Job, Genius.


The 1st ‘epoxy’ I purchased was from the local hardware store.  It was a grey paste. I am not sure what I was thinking as I applied it. Did I really think this was going to sand out and look anything different than a cement patch? And yet I proceeded.


Obviously I was not happy with the outcome. I moved on, but I tried another epoxy, this time a clear product (makes sense, huh!).


Better luck, but I still wasn’t thrilled with how it sanded out.  I need to try West Systems Epoxy and spend a couple hours experimenting with it.


Thanks for stoping by the shop. I’d love to hear your comments and thoughts on how you might have approached things differently!

Twin Cradle

My brother-in-law and his girlfriend are expecting twin boys this fall.  I was very inspired by Vic’s amazing cradle.  These boys are coming quick and I don’t think I have the time or skills just yet to crank out that level of craftsmanship.  I am sure I could do it, but the boys would be 3 years old and 4 feet tall by the time I finished it.  Vic, thanks for raising the bar so high! ;).  Finding a cradle for twins alone is a task.  I came across this crade:

It’s certainly more modern, but I like the design and have some ideas of how I can modify and improve upon this concept.  I am a little more confident that I can accomplish this in two or three  (which means five) weekends.

So stay tuned and let see how we do.